
The spoonacular recipe toolkit has three free widgets for food bloggers to help them improve their blogs— 1) the ingredient visualizer, 2) the price estimator, and 3) the nutrition visualizer. Maybe you've already seen the these widgets in action here on spoonacular.
If you're ready to:
- transform your own ingredient lists into appetizing visual lists
- provide an automatically-generated price breakdown for your recipes
- display easy-to-understand nutritional information
If you're still not sure, read this blog post about the recipe toolkit's benefits.
Get Started
Start by opening the recipe toolkit. While you're at it, open up your blog editor (WordPress, perhaps?) and pull up the page you want to include the widget on. This is probably a specific recipe post.
Click "Build the Widget" (A or B below) once you've decided which widget you want to use (you can always add the other ones later— we know it's hard to choose...)
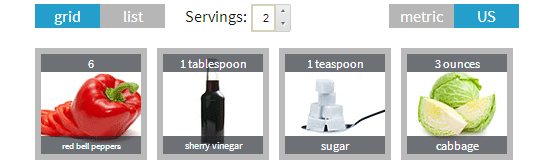
- Now that you've opened the ingredient visualizer page, you have a box for your ingredient list. Just type in or copy-and-paste your normal ingredient list, using one ingredient per line (see #1).
- Enter the number of servings your recipe makes.
- Decide between grid view or list view. Check out the examples to the right of the ingredients field. If you're still not sure, I recommend the grid. It's my personal favorite.
- Choose between US measurements (cups, tablespoons, teaspoons) or metric units (grams, milliliters).
- Click "Generate the Ingredient Visualizer"
- Copy the code (everything in the box arrow #1 is pointing at)
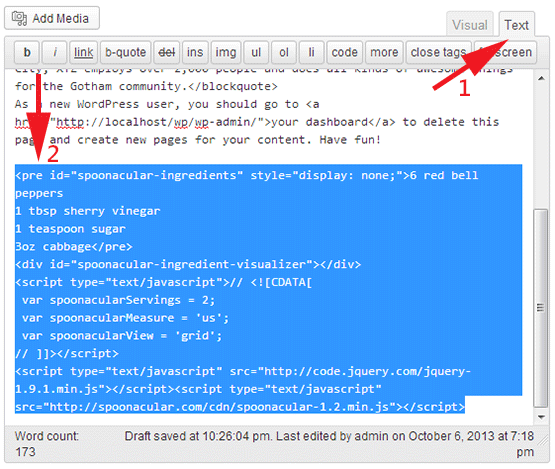
- Take a look at the editor you're using to compose or edit your blog post. You will need to make sure you're in the "Text" editor, not the "Visual" editor (see #1 below). If your editor doesn't look like the one below, feel free to contact us directly for personalized assistance.
- Paste the code you copied in step 6 into the text editor (arrow #2)
- Save and voila! If everything worked, you should now have a visualized ingredient list like the one below.

If you chose the ingredient visualizer, continue with step 1 below.
If you chose the price estimator or nutrition visualizer, click here.
Using the Ingredient Visualizer

Easy so far, right? Now it gets a little trickier, but you're almost home free.

Tasty. Once you get the hang of it, this process won't take long at all and you can quickly transform ALL your ingredient lists.
If you're ready to add the price estimator now, open the price estimator page. The next steps are very similar to what you just did; follow along below.
Using the Price/Nutrition Widgets
- Now that you've opened the price estimator or nutrition visualizer page, you have a box for your ingredient list. Just type in or copy-and-paste your normal ingredient list, using one ingredient per line (see #1)
- Enter the number of servings your recipe makes.
- For the price estimator, decide between full view or compact view. Check out the examples to the right of the ingredients field.
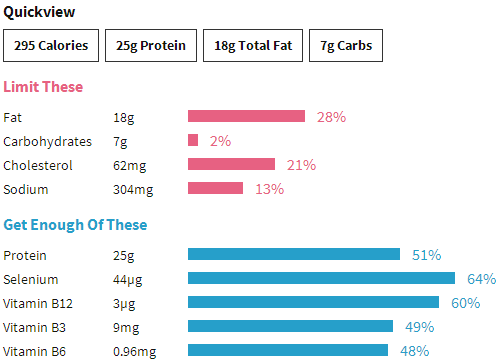
- Click "Generate the Price Estimator" or "Generate the Nutrition Visualizer"
- Copy the code (everything in the box arrow #1 is pointing at)
- Take a look at the editor you're using to compose or edit your blog post. You will need to make sure you're in the "Text" editor, not the "Visual" editor (see #1 below). If your editor doesn't look like the one below, feel free to contact us directly for personalized assistance.
- Paste the code you copied in step 5 into the text editor (arrow #2)
- Save and BAM! If everything worked, you should now have a price breakdown or a beautiful chart with nutrition facts.

The next part is a little more complicated, but hang in there! ;)

So that's a wrap! Please drop us a line if you have questions, concerns, praise, or criticism-- we want to hear it all!
Author

Written by Crystal Schlegelmilch on October 25th 2013
More Interesting Articles to Read
Improve Your Food Blog in 30 Seconds: The spoonacular Recipe Blogger Toolkit
How to Use the spoonacular App: User Guide
How to Start a Food Blog: The Ultimate Guide
How to Meal Plan: The Ultimate Guide


